Face it, we all have those dishes/foods that strike fear in the hearts of all home cooks. We all have our own "El Guapo" that we must face. Yes, the Three Amigos reference seemed appropriate there and if you haven't seen it -- Google it, then my crazy reference will make sense.
So, this inquiring mind wants to know, what ingredient or dish strikes fear into the mind of your inner cook? Seriously, I want to know and perhaps I will take it on and see how I can help you go from culinary catastrophe to culinary champion.
Ready? Set. Go!!
Sunday, May 31, 2015
Saturday, May 30, 2015
Summer Jam Reloaded
Alright, the raspberry jam is complete and it is amazing! It is thick, sweet, rich, tangy, and it is ready to go! So, just follow the recipe and you should have raspberry jam in no time.
Okay, I do want to share a couple of quick notes that will help aide in the jam making process. First, the raspberries have enough water that they will break down on their own so no mashing is required. Good, right? That means less work for you and more time to enjoy the process. Second, the raspberries have more tartness that the strawberries do, so don't add the juice of the entire lemon. You might find that it is too tart, but you can easily correct this by adding a bit more sugar or you can cut back on the lemon juice and that should work. Remember to taste as you go, but taste with care, okay? The same molten lava theory is applied here as well.
Maybe we should look at a couple of photos, sound good? Let's go!

Just like before everyone in the pool. To recap we have raspberries (2 1/2 cups), 1/4 cup sugar, a few slices of lemon peel, a pinch of salt, and the juice of one lemon.

Over medium to medium-low heat, our cauldron of goodness reduces until thick.

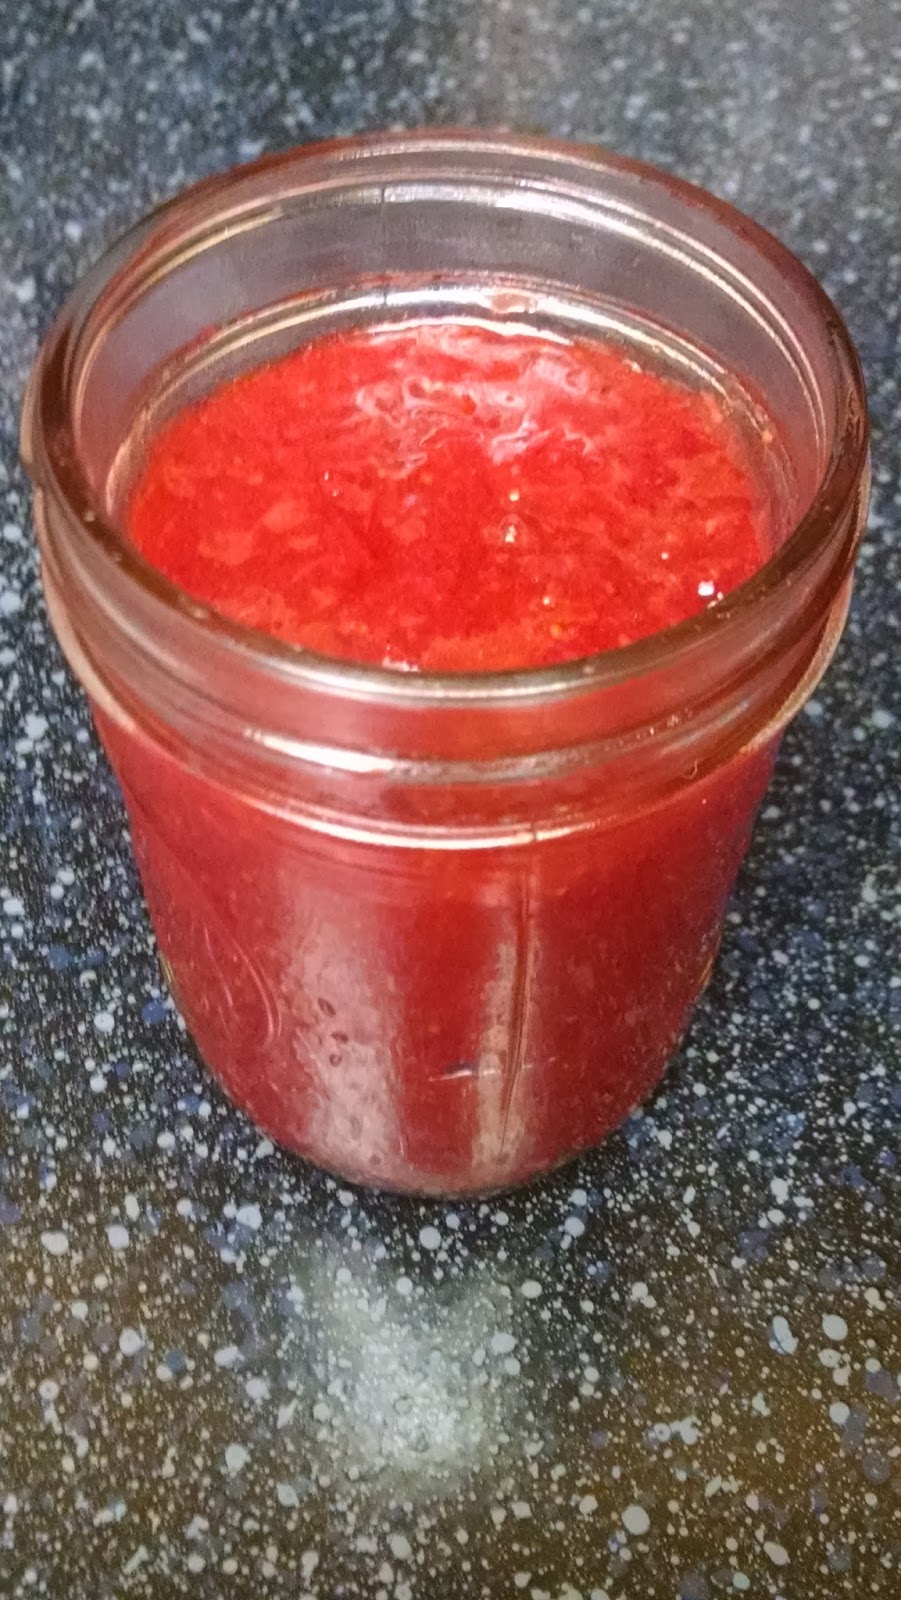
Here is the finished raspberry jam as it cools.

Again, we are in a little jar and ready to head to the fridge. This jar is about 5oz or about half a cup.
Remember to be creative with how you use this jam. But, I promise, even on a simple piece of toast this jam speaks for itself.
Enjoy!
Okay, I do want to share a couple of quick notes that will help aide in the jam making process. First, the raspberries have enough water that they will break down on their own so no mashing is required. Good, right? That means less work for you and more time to enjoy the process. Second, the raspberries have more tartness that the strawberries do, so don't add the juice of the entire lemon. You might find that it is too tart, but you can easily correct this by adding a bit more sugar or you can cut back on the lemon juice and that should work. Remember to taste as you go, but taste with care, okay? The same molten lava theory is applied here as well.
Maybe we should look at a couple of photos, sound good? Let's go!

Just like before everyone in the pool. To recap we have raspberries (2 1/2 cups), 1/4 cup sugar, a few slices of lemon peel, a pinch of salt, and the juice of one lemon.

Over medium to medium-low heat, our cauldron of goodness reduces until thick.

Here is the finished raspberry jam as it cools.

Again, we are in a little jar and ready to head to the fridge. This jar is about 5oz or about half a cup.
Remember to be creative with how you use this jam. But, I promise, even on a simple piece of toast this jam speaks for itself.
Enjoy!
Summer Days of Cooking
Did I mention that homemade jam is amazing? I was so happy with how the strawberry jam came out that I woke up dreaming about more jam. So, the first thing I did was go to the store so I could make some raspberry jam as well! Okay, confession time, I was actually looking to make blackberry jam, but they aren't in season just yet, so I opted for some amazing raspberries instead. Like the strawberry jam, the raspberry jam was a smashing success! I have pictures to share and will follow up on this later.
On deck tonight, is salmon with a grilled lemon butter sauce. Yep, we are going to grill the lemons to help add some additional complexity to the sauce. Also, we aren't going to finish the sauce with butter, but bring the lemon juice and the butter together into one rich, lemony sauce.
Sounds good, right? Stay tuned. These posts are still to come!
Friday, May 29, 2015
Your Summer Jam
There is nothing more satisfying after your morning cup of coffee or tea, than reaching into your fridge and grabbing your very own homemade jam. I'm not talking about jam that takes a week to make, a day to make, or hours to make -- but homemade jam that you can make in a hour and will be ready to consume as soon as it cools!
What kind of jam you ask? Strawberries, blueberries, peaches, and a variety of other amazing fruits will make excellent jam. Why not, right? Imagine slathering some of this easy, sweet, rich, and tangy, very thick homemade jam on a piece of a buttered toast, or some stunning pancakes to start any weekday or for a special occasion. Heck, you could do all the same for a simple afternoon snack or as an amazing ice cream topper to break out of your usual routine for a special treat.
There you are, ready to go at a moments notice, your very own homemade jam! Why am I still talking about making this jam? Let's do this!
Okay, the recipe for this jam is included below. I have included the original link if you want to see how it was constructed. However, this original recipe isn't very well written in my opinion, but I'm going to write my version of the same recipe below that will be much easier to follow.
This recipe is courtesy of the www.thekitchn.com and the original link to the recipe is included here: http://www.thekitchn.com/how-to-make-basic-fruit-jam-cooking-lessons-from-the-kitchn-193560
Homemade Quick Fruit Jam:
Ingredients:
2 1/2 cups of any fruit of your choice, diced
1 lemon juiced
1/4 cup of sugar
A pinch of salt
2 slices of lemon rind
- Combine all ingredients into a medium-sized pot. Turn the heat to medium and once the mixture comes a boil, mash the fruit until you reach the desired texture Keep in mind, the strawberries will break down more as the jam cooks and you can always mash the fruit chunks more if you need to. Reduce the heat to medium-low until the contents are simmering steadily, but gently. Make sure to stir this mixture every couple of minutes, and let the mixture continue to reduce until you can coat the back of the spoon. Then transfer your jam to a heat proof bowl or mason jar.
Notes: Please note the following in trying this recipe at home.
- Do not attempt to check how thick the mixture is by tasting your jam until it is cool. You have very, very hot sugar in this pot with your fruit and it will adhere to your tongue or skin and burn you if you taste the contents or if it comes into contact with skin. So please be very careful in stirring or tasting when all the sugar and fruit are hotter than molten lava.
- Second, the jam will be at it's full thickness once it has cooled completely. In order to check the thickness just spoon out a little bit of the jam into a dish or onto a plate, and after giving it a few minutes to cool you will be able to taste your jam and see how thick it will be. Or dip your spoon into the jam, and after it cools draw a straight line through the jam coating the back of the spoon with your finger. If you get a clean line then your jam has thickened. This is really a personal preference, so check the jam often to make sure the thickness is to your liking. It is also a good time to make sure you have enough sweetness or citrus in the jam by carefully tasting the cooled jam. If you desire more of sugar or a little more lemon flavor, feel free to add more to suit your tastes. I added an extra teaspoon of sugar to my batch, even though it would have probably been fine without it.
- Reducing this jam does take time, so be patient. However, the result of your patience will pay off in dividends with this recipe.
Shall we look at some photos? Yup, let's do it!

Here they are in all their strawberry glory. Just cut the tops off and slice these into quarters. If you have a few that are overripe, don't worry -- that will help fortify the sweetness and that amazing strawberry flavor.

Alright, everyone in the sauce pot. To get the lemon peel off, use your vegetable peeler and peel two strips off the lemon before you juice it. Trust me, it is easier to do when the lemon is still intact. You will fish these lemon peels out once you are ready to let your jam cool.

We have brought the mixture to a boil, and begun to mash the fruit chunks. When you reach this general consistency, you are ready to achieve jam nirvana.

I included this shot so you can get an idea of what your simmer should look like while your jam reduces and thickens.

Alright at this point, the photo above shows the jam once it was transferred to a bowl to cool. As it cools, stir the mixture every couple of minutes as this will help speed up the the cool-down process. Otherwise, you will only expose a certain portion of the hot jam to room temperature air and it will take much longer to cool. You can't wait too long to try this jam, right?!

After it begins to cool, you will notice there is a change in the color of the jam. This is a good sign, so let the jam just continue jammin'. Yeah, I had to do that!
Here it is.Your finished jam in a jar. This recipe yielded about 7 oz or just under one cup of jam.
Congratulations! You have done it! Your very own homemade, delicious fruit jam. Don't forget, this will work with a myriad of fruits. Please note, once you throw this in the fridge it will keep up to three weeks. One last thing to keep in mind, we haven't added any preservatives to this at all. The jam thickened on its own and all we applied were some basic techniques and a little bit of heat.
There you are! I hope you enjoy this stunning, summer jam!
Thursday, May 28, 2015
Save a Little Bread for Me
I always hate it when I end up with a little leftover bread or a loaf that might be a little more dried out than I want. I'm never sure what to do with it, but as summer approaches, the answer is very clear. Make homemade croutons!
Croutons can be a great addition to salads, soup, or used as chili toppers, stand-alone snacks, stuffing applications, and are a great serving method for roasted meats. You can make croutons out of your favorite bread, such as sourdough, french, whole wheat, ciabatta (and the list goes on). For this post, I will be using a sourdough loaf for our croutons recipe.
Oh, why are we using a whole loaf instead of slices of bread you ask? Well, for a couple of reasons, but primarily because you can cut the croutons to the size of your choosing. Additionally, if you end up using sliced bread, those loaves are typically cut into thin slices, which means your croutons won't have that beautiful shape and really stand out. If you don't want to cut the bread yourself, you should be able to ask your bakery if they will slice the bread into squares for you. If you ask nicely, the bakery might hand cut some thicker slices for you too. Also, in my opinion larger-sized cube-shaped crouton are able to absorb seasonings easier and won't become overcooked too quickly. Now, this isn't to say you couldn't use a simple style white bread, because you certainly could do so if that is your preference. However, go with what you like and what works for you because that's what is most important when it comes to cooking.
Okay, so what do we are we going to use to create these crispy, golden squares of goodness? Well, there are 3 components to a perfect crouton that you will always need. Those elements are oil (your choice), salt, and pepper, of course. After that, well, the world is your oyster (or crouton...), I think you get the idea. In other words, you can season these croutons with anything you want. Typically croutons are seasoned with dried oregano, dried basil, and some garlic powder. However, if you like a little more heat or color, then I would say add a little chili powder or paprika respectively.
Ready to make these? Me too! Let's go!
 Fear not, it is only bread. Yes, this is a full loaf of Sourdough I am using.
 After you cut off the ends of the loaf, slice into 3 equal width sheets.
 Cut the sheets into strips and then cut into cubes. The croutons should look something like this. If you have some odd shaped pieces, don't worry. You can cook them separately or just pull them a little earlier so they don't get too crunchy or dark.

Everything in the pan (shown above). As noted earlier, I stayed with the classic combination of olive oil, salt, pepper, dried oregano, dried basil, and a little garlic salt.

After about 10-15 minutes of cooking on medium or medium-low heat you will end up with these beauties. Make no mistake, these are crispy, flavorful and crunchy at this point. The cubes don't need to be totally dark and dried out in order to achieve that perfect texture like you might see at your local store. Stir these every few minutes, but give them a chance to get the color and texture you need. I suggest tasting often in order to gauge the seasoning and to make sure you are happy with the results.
Some people prefer their croutons a little softer, while other prefer a little more crunch. When you are happy with the croutons, pull the pan off of the heat and let the croutons cool in the pan until you move the finished product to the assigned storage apparatus.
Homemade Croutons:
About a cup of cubed bread
2-4 tablespoons of olive oil
2 teaspoon salt
Fresh Ground pepper to taste
2 tsp dried basil
2 tsp dried oregano
1/2 teaspoon of garlic powder
Heat oil in a non stick skillet over medium heat. When oil starts to shimmer add cubed bread to pan.
Add seasonings and toss to make sure the cubes are well coated. Allow bread to get golden brown on all sides and turn occasionally. When the croutons are cooled, store in an airtight container in your pantry for up to a week. Also, you can transfer the croutons to an airtight container or freezer safe bag and store for up to 6 months.
*The quality will be better if they are used sooner, but the croutons will still be very tasty.*
Note that I have between 2-4 tablespoons of oil listed in the recipe. The cubes will absorb this oil, so add a little more oil as needed and it will help coax the beautiful golden color to the surface and it will also give the seasoning something to adhere as you make your croutons.
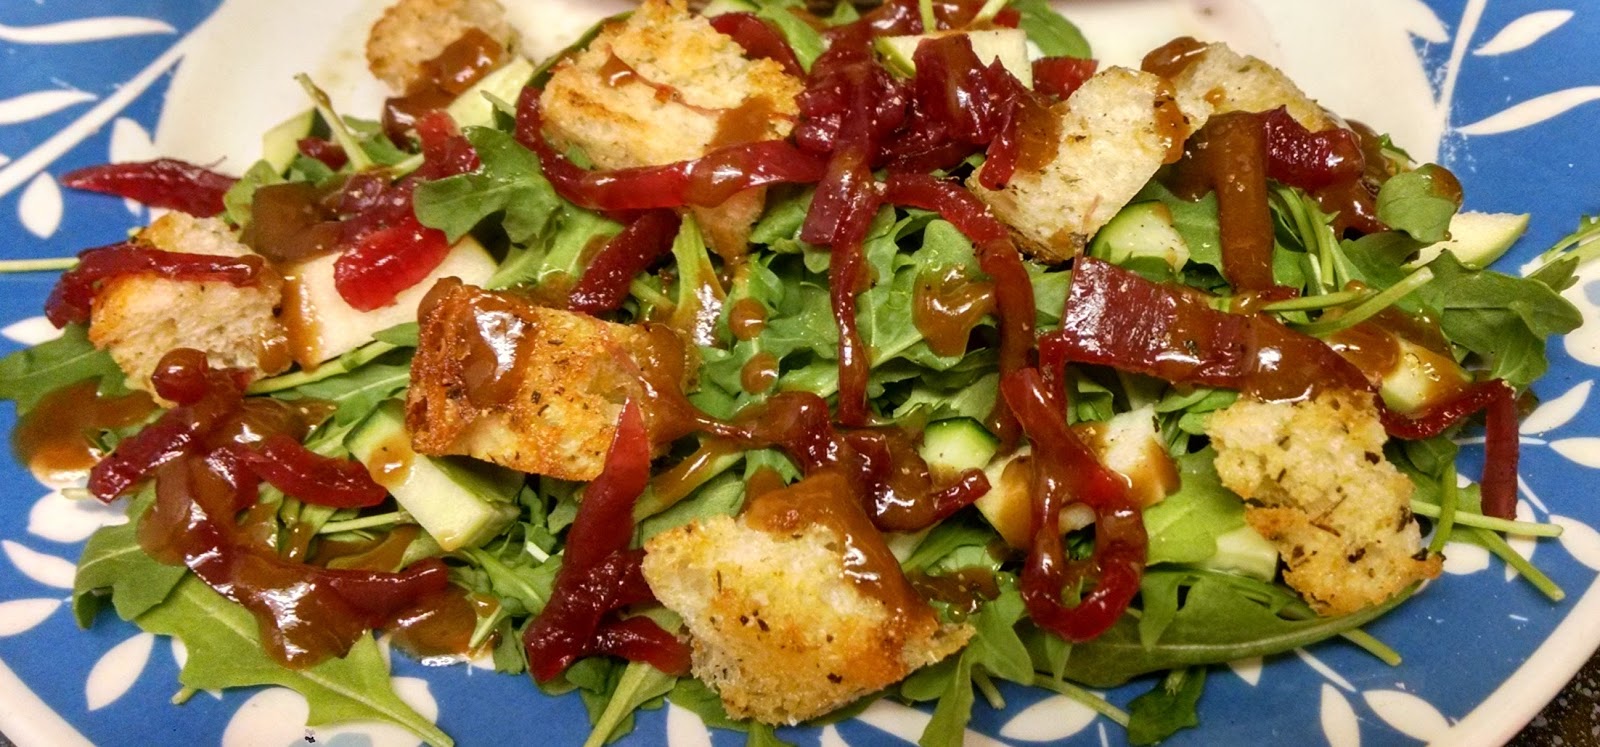
In case you are wondering what this might look, well here you go!
 Oh, yeah, I do have some of my pickled onions in this salad along with my homemade balsamic vinaigrette.
By the way, I forgot to mention the other great thing about this recipe is you get to control what is in your croutons. As you know, I am a big proponent of knowing what is in your food, and these croutons are no different. Next time you are at the grocery store glance at the ingredient list on the back of a bag of croutons. Now, count the ingredients, I will wait..............done? No? So many of those ingredients aren't necessary and only provide shelf-life stability. Very little of that list has anything to do with the flavor, I promise. So, take solace once again in knowing exactly what you are eating.
Oh, yeah, if you have any croutons left over at the end of the week, you can use them to make breadcrumbs. Throw those croutons in a food processor or blender and pulse until you have your own homemade breadcrumbs. You now have opened the door to such things as shallow fried eggplant, or chicken or pork cutlets that are pounded thin and cooked in some oil till they are crisp. Just dip your vegetable or protein and saute till done. Don't worry, we will cover all that too!
I hope you enjoy finding ways to enjoy these amazing croutons. In addition, don't be afraid to try some other seasoning combinations to make this recipe your own. Croutons are great to have around and are so easy to make. Remember, have patience and as with so many of the other recipes you find on this site and you will be rewarded.
Enjoy!
Croutons can be a great addition to salads, soup, or used as chili toppers, stand-alone snacks, stuffing applications, and are a great serving method for roasted meats. You can make croutons out of your favorite bread, such as sourdough, french, whole wheat, ciabatta (and the list goes on). For this post, I will be using a sourdough loaf for our croutons recipe.
Oh, why are we using a whole loaf instead of slices of bread you ask? Well, for a couple of reasons, but primarily because you can cut the croutons to the size of your choosing. Additionally, if you end up using sliced bread, those loaves are typically cut into thin slices, which means your croutons won't have that beautiful shape and really stand out. If you don't want to cut the bread yourself, you should be able to ask your bakery if they will slice the bread into squares for you. If you ask nicely, the bakery might hand cut some thicker slices for you too. Also, in my opinion larger-sized cube-shaped crouton are able to absorb seasonings easier and won't become overcooked too quickly. Now, this isn't to say you couldn't use a simple style white bread, because you certainly could do so if that is your preference. However, go with what you like and what works for you because that's what is most important when it comes to cooking.
Okay, so what do we are we going to use to create these crispy, golden squares of goodness? Well, there are 3 components to a perfect crouton that you will always need. Those elements are oil (your choice), salt, and pepper, of course. After that, well, the world is your oyster (or crouton...), I think you get the idea. In other words, you can season these croutons with anything you want. Typically croutons are seasoned with dried oregano, dried basil, and some garlic powder. However, if you like a little more heat or color, then I would say add a little chili powder or paprika respectively.
Ready to make these? Me too! Let's go!


Everything in the pan (shown above). As noted earlier, I stayed with the classic combination of olive oil, salt, pepper, dried oregano, dried basil, and a little garlic salt.

After about 10-15 minutes of cooking on medium or medium-low heat you will end up with these beauties. Make no mistake, these are crispy, flavorful and crunchy at this point. The cubes don't need to be totally dark and dried out in order to achieve that perfect texture like you might see at your local store. Stir these every few minutes, but give them a chance to get the color and texture you need. I suggest tasting often in order to gauge the seasoning and to make sure you are happy with the results.
Some people prefer their croutons a little softer, while other prefer a little more crunch. When you are happy with the croutons, pull the pan off of the heat and let the croutons cool in the pan until you move the finished product to the assigned storage apparatus.
Homemade Croutons:
About a cup of cubed bread
2-4 tablespoons of olive oil
2 teaspoon salt
Fresh Ground pepper to taste
2 tsp dried basil
2 tsp dried oregano
1/2 teaspoon of garlic powder
Heat oil in a non stick skillet over medium heat. When oil starts to shimmer add cubed bread to pan.
Add seasonings and toss to make sure the cubes are well coated. Allow bread to get golden brown on all sides and turn occasionally. When the croutons are cooled, store in an airtight container in your pantry for up to a week. Also, you can transfer the croutons to an airtight container or freezer safe bag and store for up to 6 months.
*The quality will be better if they are used sooner, but the croutons will still be very tasty.*
Note that I have between 2-4 tablespoons of oil listed in the recipe. The cubes will absorb this oil, so add a little more oil as needed and it will help coax the beautiful golden color to the surface and it will also give the seasoning something to adhere as you make your croutons.
In case you are wondering what this might look, well here you go!
By the way, I forgot to mention the other great thing about this recipe is you get to control what is in your croutons. As you know, I am a big proponent of knowing what is in your food, and these croutons are no different. Next time you are at the grocery store glance at the ingredient list on the back of a bag of croutons. Now, count the ingredients, I will wait..............done? No? So many of those ingredients aren't necessary and only provide shelf-life stability. Very little of that list has anything to do with the flavor, I promise. So, take solace once again in knowing exactly what you are eating.
Oh, yeah, if you have any croutons left over at the end of the week, you can use them to make breadcrumbs. Throw those croutons in a food processor or blender and pulse until you have your own homemade breadcrumbs. You now have opened the door to such things as shallow fried eggplant, or chicken or pork cutlets that are pounded thin and cooked in some oil till they are crisp. Just dip your vegetable or protein and saute till done. Don't worry, we will cover all that too!
I hope you enjoy finding ways to enjoy these amazing croutons. In addition, don't be afraid to try some other seasoning combinations to make this recipe your own. Croutons are great to have around and are so easy to make. Remember, have patience and as with so many of the other recipes you find on this site and you will be rewarded.
Enjoy!
Wednesday, May 27, 2015
Salvo of Sauces Follow Up
So, I was talking about the versatility of the blueberry balsamic barbecue sauce and I wanted to share how else you could use it. We grilled some chicken breasts and in the last 5 minutes on the grill I slathered on some of the barbecue sauce and let it adhere, caramelize, and get all bubbly. So, here is the finished product for your enjoyment.

It combined with a perfectly cooked piece of chicken to create literally some of the most delicious, and juicy to grilled chicken breasts, and added some subtle complexity to the dish. Seriously, this sauce is so good!
What's more, we still had some left for dipping! How can you beat that?
Yes, we served it with a beautiful salad, but options are limitless. Hope this inspires you to break out the blueberry barbecue sauce for your next grilled chicken dish!
Tuesday, May 26, 2015
Salvo of Sauces
My house is a ketchup free zone... This is for two reasons, firstly my girlfriend isn't a ketchup fan, therefore, it would be on me to consume it all and no one wants to see me trying to eat a bowl of ketchup! Second, for most applications that require ketchup, my barbecue sauces have a very similar flavor profile.
The problem with most big brand ketchup is that the amount of sugar and additives aren't actually needed to recreate the flavors. The challenge here was I needed 3 tablespoons of ketchup to complete the full barbecue sauce recipe. So in order to create one sauce I had to create two sauces.
The mission, if I chose to accept, was to create a blueberry barbecue sauce. This resulted in my to find 3 tablespoons of ketchup. I won't get into all the details, but lets just say I did try to calculate how many single ketchup packets I would need in order to reach my goal. However, one thing was clear, I could make this better at home any day of the week.
The ketchup I ended up creating required a ton of tweaking, so it is still a work in progress and isn't ready for it's debut. The premise of ketchup is pretty simple, some kind of tomato product, some vinegar, a little sweetener, garlic powder, salt, pepper, and some worcestershire sauce to help fortify the flavors. Since it all ended up in the barbecue sauce anyways, it worked out just fine. If you don't want to fight the windmill of deciphering ketchup, you can always use the barbecue sauce referenced in the "Case of the Partially Perfect Recipe."
I had been trying to figure out how to adapt fruit into a barbecue sauce now that it is in season again. So the hunt begin! I found a recipe that I have made some adjustments to in order to help really deliver bold flavors. Let's take a look at the recipe, shall we?
The original recipe can be found at http://www.myrecipes.com/recipe/blueberry-balsamic-barbecue-sauce
*Please Note: My changes can be found in italics, but I have left the original recipe intact.
Blueberry Barbecue Sauce:
1/4 teaspoon
salt
1/4 teaspoon pepper
1-2 teaspoons paprika
Place all ingredients in a saucepan and bring to a boil. Reduce heat, and simmer for 15 minutes or until slightly thick. Remove from heat and cool. Place blueberry mixture in a blender, processing the ingredients until smooth. If the sauce isn't thick enough you can return it to the pot and apply low heat as a measure to thicken sauce. Keep in mind, once the sauce cools it will thicken quickly. So, if you need to thin it out just add a couple tablespoons of water, and taste the sauce to make sure it hasn't thinned out too much.
Ready to look at some photos? Let's go!

All ingredients, please report to the saucepot. This is not a drill, I repeat, this is not a drill! Even though this doesn't look like a lot of liquid, don't worry, as soon as the blueberries begin to break down you will be surprised by how much liquid appears.

After 15 minutes, a trip through a blender, and a quick dip into the saucepot again, this is your finished product.
 Here is one application with the barbecue sauce brushed on some tri tip. This is just one of many ways to use this barbecue sauce too.
How else might you apply this luscious, rich, tangy sauce? Run out of mayo or regular, everyday barbecue sauce in the fridge? Throw some of this on your sandwich as your condiment instead. Well, truth is, you can apply this to pork, chicken or even fish. Yep, fish would work as well. I would recommend salmon or a very hearty, rich fish as the blueberry and balsamic will be a nice counterpoint. Like with the teriyaki, just brush some on and pop it the oven. About halfway through pull the fish out and brush a little more on the fish. Or, leave some on the side when you serve this fish with a nice wedge of lemon. If you really want to apply a fun twist, brush some of this on some vegetables to roast in the oven or grill. You could use carrots, zucchini, mushroom, broccoli, and cauliflower as well. So, once again, this sauce can be use in just about any application.
Enjoy!
The problem with most big brand ketchup is that the amount of sugar and additives aren't actually needed to recreate the flavors. The challenge here was I needed 3 tablespoons of ketchup to complete the full barbecue sauce recipe. So in order to create one sauce I had to create two sauces.
The mission, if I chose to accept, was to create a blueberry barbecue sauce. This resulted in my to find 3 tablespoons of ketchup. I won't get into all the details, but lets just say I did try to calculate how many single ketchup packets I would need in order to reach my goal. However, one thing was clear, I could make this better at home any day of the week.
The ketchup I ended up creating required a ton of tweaking, so it is still a work in progress and isn't ready for it's debut. The premise of ketchup is pretty simple, some kind of tomato product, some vinegar, a little sweetener, garlic powder, salt, pepper, and some worcestershire sauce to help fortify the flavors. Since it all ended up in the barbecue sauce anyways, it worked out just fine. If you don't want to fight the windmill of deciphering ketchup, you can always use the barbecue sauce referenced in the "Case of the Partially Perfect Recipe."
I had been trying to figure out how to adapt fruit into a barbecue sauce now that it is in season again. So the hunt begin! I found a recipe that I have made some adjustments to in order to help really deliver bold flavors. Let's take a look at the recipe, shall we?
The original recipe can be found at http://www.myrecipes.com/recipe/blueberry-balsamic-barbecue-sauce
*Please Note: My changes can be found in italics, but I have left the original recipe intact.
Blueberry Barbecue Sauce:
2 cups
fresh blueberries
1/4 cup
balsamic vinegar
3 tablespoons
sugar or 1 tablespoon of brown sugar
3 tablespoons
ketchup or homemade barbecue sauce
1/2 teaspoon
garlic powder or 1 clove garlic minced
1/4 teaspoon pepper
1-2 teaspoons paprika
Place all ingredients in a saucepan and bring to a boil. Reduce heat, and simmer for 15 minutes or until slightly thick. Remove from heat and cool. Place blueberry mixture in a blender, processing the ingredients until smooth. If the sauce isn't thick enough you can return it to the pot and apply low heat as a measure to thicken sauce. Keep in mind, once the sauce cools it will thicken quickly. So, if you need to thin it out just add a couple tablespoons of water, and taste the sauce to make sure it hasn't thinned out too much.
Ready to look at some photos? Let's go!

All ingredients, please report to the saucepot. This is not a drill, I repeat, this is not a drill! Even though this doesn't look like a lot of liquid, don't worry, as soon as the blueberries begin to break down you will be surprised by how much liquid appears.

After 15 minutes, a trip through a blender, and a quick dip into the saucepot again, this is your finished product.

How else might you apply this luscious, rich, tangy sauce? Run out of mayo or regular, everyday barbecue sauce in the fridge? Throw some of this on your sandwich as your condiment instead. Well, truth is, you can apply this to pork, chicken or even fish. Yep, fish would work as well. I would recommend salmon or a very hearty, rich fish as the blueberry and balsamic will be a nice counterpoint. Like with the teriyaki, just brush some on and pop it the oven. About halfway through pull the fish out and brush a little more on the fish. Or, leave some on the side when you serve this fish with a nice wedge of lemon. If you really want to apply a fun twist, brush some of this on some vegetables to roast in the oven or grill. You could use carrots, zucchini, mushroom, broccoli, and cauliflower as well. So, once again, this sauce can be use in just about any application.
Enjoy!
Subscribe to:
Posts (Atom)